


Congratulations! Your team has decided to start working with StoryChief to streamline content operations for all your client content campaigns. 🎉
We know that adding a new tool to your marketing toolbox can be daunting. But fret not, we have great news:
- StoryChief is here to replace all the other tools you are using to create, publish and monitor content, saving you lots of time and frustration.
- You’re not in this alone - We guide you through the entire process of publishing your first campaign, from start to finish.
Let’s dive in. 👇
How to Use StoryChief as an Agency or Marketing Team
This guide will cover two main goals:
- Onboarding your colleagues and show them how to use the tool
- Introducing StoryChief to your clients and establishing a workflow that works for you
💡 Did you know? One of the great things about StoryChief is that next to collaborating with your colleagues, you can invite your clients to the tool to improve communication and create a flawless content approval process. By allocating each of your clients to a dedicated workspace, you’ll ensure they have their own individual space, access and calendar to work with.
In this 2-minute video, we share a quick overview of how to start with StoryChief.
Table of contents:
1. Invite colleagues and clients
2. Connect your channels
3. Create a tailored content strategy with AI
4. Create a content calendar & campaign
5. Share your content calendar with clients
6. Write blog articles without distractions
7. Improve SEO and increase traffic
8. Assign content briefs
9. Give feedback and approve
10. Publish to all your channels and notify colleagues
11. Reach more people with social media
12. Tailor your content to different channels
13. Monitor the results
1. Invite colleagues (and clients)
Your invitees can be copywriters, designers, social media managers, marketers and everyone involved in the content creation process. You can choose how much access you want to grant them by giving them specific roles.
Once the client workspace is set up with users, channels and some campaigns, you might want to invite your clients too, so that they are always aware of each stage of the process.
More about managing users ⬇
2. Connect your channels
StoryChief supports a wide range of platforms to publish your content to and manage from one single tool.
- Websites & blogs (WordPress, HubSpot, Drupal, Webflow etc),
- Social media platforms (Instagram, Facebook, TikTok etc),
- Email marketing tools (Mailchimp, Campaign Monitor etc),
- Employee advocacy
- Content hubs (e.g. Medium)
- and so much more.

The more channels, the merrier! Connect for each of your clients the platforms that they want to use to reach a wider public.
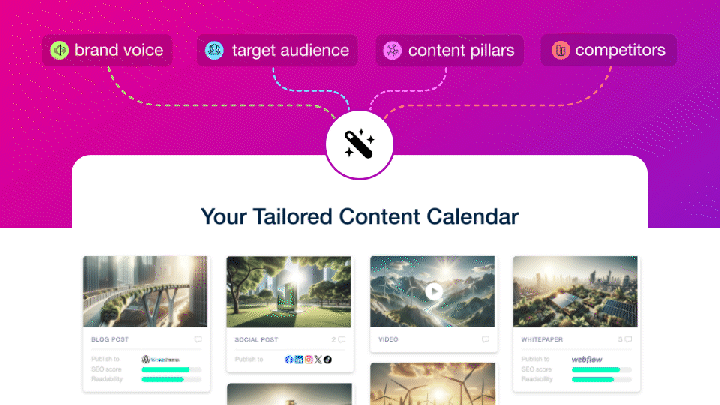
3. Create a tailored content strategy with AI
Our AI Content Strategy Builder provides agencies with an efficient way to create customized content marketing strategies that attract relevant audiences, increase visibility, and drive organic growth.
By simply pasting your company's URL, the tool initiates a detailed analysis of your website, providing a content strategy with fresh ideas, targeted SEO keywords, and a meticulously planned content calendar – all in minutes.
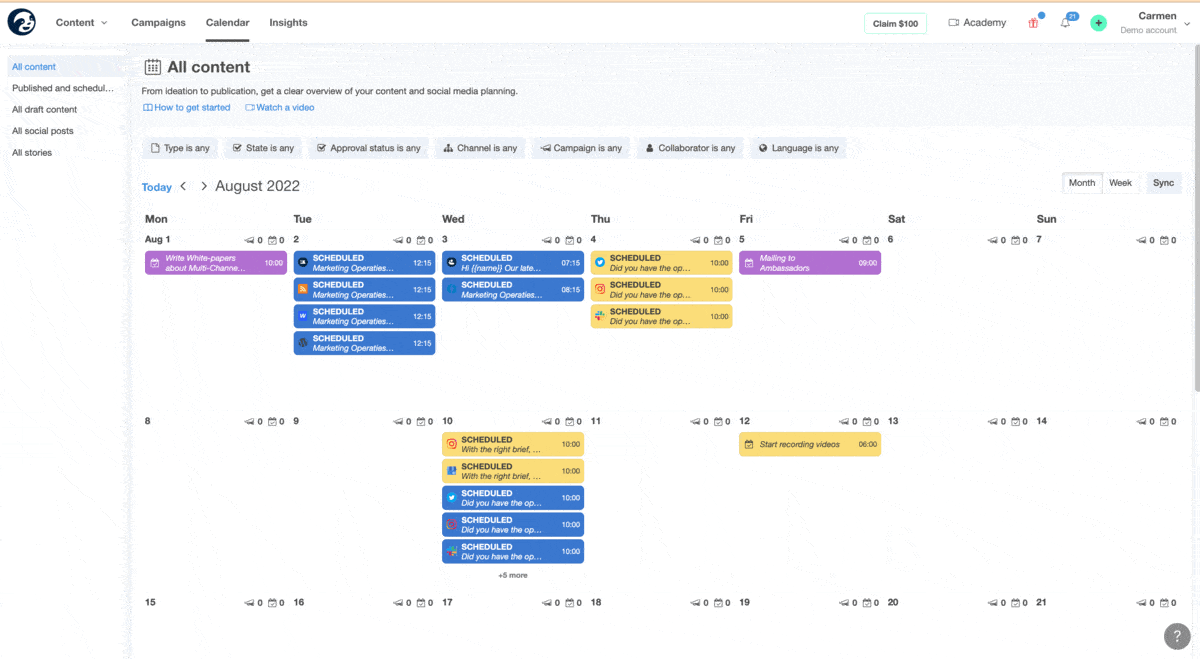
4. Fill your content calendar & create a campaign
Once the users and the channels have been added to the workspaces, it’s time to create content calendars and campaign(s) to organize your clients' content.
You can see a campaign as a way to organize content that follows the same topic or theme and that will be published during a specific timeframe. You can combine blog articles, social posts, newsletters and events into a campaign.
Your campaign will be the place where both your colleagues and your clients can follow up on the process, deadlines, performance and evolution. Using the campaign's content calendar is a great way to start creating and planning content to visualize the client’s strategy.
More about managing your content calendar. ⬇
More about managing campaigns. ⬇
💡 Do you want to know more about how to plan an effective content campaign? Have a look at our recommendations here.
5. Share your content calendar with clients for feedback
Creating content calendar(s) and campaigns are crucial to organize your clients’ content and making sure everyone is aligned on the process.
For example: In the context of a campaign that you have created for a client to launch a new product over the Christmas period, your client wants a very well-defined social media strategy to promote it, so you create a content calendar with a number of social posts to be published every Monday and Thursday on Instagram, Facebook and Twitter.
By adding all these draft social posts to the StoryChief calendar, your calendar becomes a visual representation of your strategy, allowing everyone to follow the status of things. Moreover, you’ll be able to share this specific calendar with them, so that they can check its status and send feedback as needed.
6. Write your blog articles without distractions
Let’s now move further onto another great feature within StoryChief: the story editor with built-in SEO optimization and AI writing.
The blog editor has everything you (or your copywriters) need to write a complete blog article, embed all types of rich media, and improve SEO & readability. You can even configure the metadata and publish without having to go into your CMS.
Moreover, you can enable our AI Power Mode feature to get endless content inspiration and assistance in writing, rewriting, optimizing, translating, and summarizing compelling copy.
More about creating your first story. ⬇
Want to hear the best part of publishing directly to your CMS? You don’t need to worry about setting up your font, colors, size or anything related to the layout of the article. Why? Because when publishing the story, StoryChief automatically applies your predefined layout and brand identity. This will save your copywriters tons of time and your client can be 100% sure that his predefined layout will always be respected.
More about managing your content archive. ⬇
7. Get more traffic by improving your SEO scores
A good SEO score is key to making sure your article is found and read by as many people as possible. Thanks to the built-in SEO feature, your copywriters don’t need to use other tools to achieve organic success.
Enter your keyword and let the StoryChief magic surprise you. You’ll be presented with a number of tips on how to optimize your text to increase your SEO and readability score.
- A good SEO score translates into a better ranking of your blog article on Google and other search engines. The higher up you are on the ranking, the more traffic your article will receive.
- The readability score indicates how well the story is understood by search engines and people, so include headings and subheadings, and avoid using too many technical words or too long paragraphs.

Want to know all about SEO, why it’s so important, and how it works? Have a look at our 1-hour interactive SEO course tailored to your data. Identify high-impact SEO opportunities, gain valuable insights, and develop actionable plans with comprehensive reports for your clients.

8. Assign content briefs to colleagues and freelancers
When working at a content agency, there are usually well-defined roles for each of you. It’s very likely that you are in charge of creating the campaigns, communicating with your clients, and making sure everyone meets the deadlines on time, while your copywriters are mostly in charge of writing the copies following your and your client’s wishes.
We want to make this process as smooth as possible, and that’s why with StoryChief you can create editorial briefs and assign them to the copywriters responsible for the story. Thanks to this editorial brief they can follow instructions on what to write, the tone of voice, the length of the story, the deadline etc.
Here is an example of an AI-generated editorial brief.

The biggest advantage of having the editorial brief attached to the story is that the copywriter doesn’t need to look into an endless amount of emails or notes, and everyone with access to the story can see the brief, whether this is the customer or another copywriter in case the first one goes on holiday before finishing up.
Bonus tip: you can customize the brief template per workspace to follow the same structure on all your stories.
9. Give feedback and approve
StoryChief does not only help you create and publish content, but it also improves communication and collaboration, whether this is with your internal team or your clients.
Once your copywriters have written their copy, they can ask for approval. You or your client can approve (and schedule) content immediately, or send feedback to the copywriter. They are then notified so they can make the necessary changes before the article goes live.
More about content approvals. ⬇
10. Publish to all your channels and notify ambassadors
At this point, if you have been following the previous steps, your client’s content strategy is already being executed and a number of stories have been written, reviewed and approved.
All this content is now ready to be published! You have two options:
- Publish now
- Schedule your content to be published later
The steps to take are very easy: inside your story, move to the Audience tab and set the date & time of each destination where you want this blog article to appear.
Bonus tip: Enable the Ambassadors channel to notify colleagues and ambassadors about the content you just published. The content will be sent out via email, together with buttons to social media platforms, so they can reshare and engage immediately. This will increase your organic traffic, reach and engagement exponentially!
More about Ambassadors ⬇
To publish, just hit ‘Publish’ or ‘Schedule’ and voilà 🎉! Your content will appear on all the selected destinations.
11. Reach more people with social media
Congratulations on publishing your first blog article from StoryChief! It has been a great experience, hasn’t it?
Now it’s time to promote this blog post on social media to maximize organic reach.
Here’s how to create a social post in StoryChief:
- If you have already created some draft social posts when working on your campaign or content calendar, it’s time to go back to those to start working on them.
- If you haven’t prepared any social posts yet, you can create one directly from the recently published story.
As a result, you’ll be brought to the social post editor, way smaller and even simpler than the stories editor. On the right-hand side, you’ll find the place to type your caption and add your media. On the left-hand side, you’ll be able to enable all the social media channels you want to publish the content to, including your Ambassador lists.
More about creating social posts ⬇
12. Tailor content to different channels
Each social media platform has a different type of audience and works with different algorithms, so we advise you to customize each social media channel to maximize engagement there. With StoryChief, you can alter the caption, tag other accounts, add audience restrictions, define UTM tags etc.
💡 Tip: When tailing to copy, the other channels will keep the original message, so the changes only affect the selected destination(s).
Being able to customize content on each channel will save you and your social media managers tons of time, right? They will no longer have to go to each separate channel and copy/paste the copy!
Should you struggle with finding a catchy caption for your post, no worries, StoryChief has you covered. Just use our AI Power Mode feature, and you’ll be able to generate a post from any given sentence, keyword or article.
Once your post is approved and ready, just as with stories, select the time & date for each destination and hit Publish or Schedule 🎉!
13. Monitor the results
Checking the metrics and the evolution of your content regularly will help you make the right business decisions and invest in the most suitable channels.
With StoryChief you can easily monitor content performance on 3 levels: On an individual content level, campaign level, or across all channels.
Monitoring results on content level
After a story or a social post has been published, a report will be available with very specific metrics about that blog or social post.
- Engagement rate and engagement rate per published destination
- Total number of engagements and number of engagements per published destination
- Total number of impressions and number of impressions per published destination
- Number of clicks, comments, shares and likes per published destination
- Total number of impressions
- Average read time
- Channel breakdown: It shows how many reads each published destination received, including ambassadors
- Organic performance (CTR and keyword positions)
Monitoring results on a campaign level
A campaign is a collection of different stories, social posts, newsletters and events. Each campaign shows a number of insights from all the published content that belongs to that campaign. It’s a great way to see in one glance how your campaign is performing - on its own as well as compared to other campaigns.
Per campaign, you’ll find a total number of reads, impressions, and engagement. You’ll also find a top 5 ranking with the articles and social posts that are performing the best - so you can use them as inspiration for new posts.
Monitoring results across all channels
The Insights page is a great way to track an aggregate overview of your social and SEO performance.
Gain valuable insights into your website's performance by analyzing its total impressions, clicks, average position, and average click-through rate.
You can also identify your top keywords, as well as the keywords that are growing or declining in popularity, and learn how to use this information to enhance your SEO content strategy.
It allows you to gain insights into:
- The number of times your site is viewed
- The number of times users click on your site
- Your site's ranking in search results
- The click-through rate (CTR)
- Top keywords
- Most growing keywords
- Declining keywords
- And more.


You made it this far...
Congratulations! You just learned how to create, approve, publish and monitor your first content campaign through StoryChief. 🎉 If you have any more questions after this, feel free to contact us through the chat.
Before you go - Don’t have an account yet and want to try this content marketing magic out for yourself? Get started today with our free trial.

